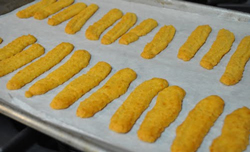
ShoppingCart.current.id[o22767585]
ShoppingCart.current.country[US]
ShoppingCart.persistOrders[true]
ShoppingCart.persistOrdersForAnonymousUsers[false]
  • United States(Change)
  • Contact and Support
  • My Account
    close
    • My Account
    • My Viking Kitchen
    • Product Registration
    • Orders
    • My Quotes
    • Address Book
    • Profile
  • Login
    New Account
    Returning Member
    close
    Create New Account
    Forgot password?
    Remember me?
  • Request a Quote
  • (0)
    Your shopping cart is empty. close
    Continue Shopping

Viking: Professional Performance for the Home

Owner's Exclusive Link

= Owner's Exclusive Content

  • Products
    • Cooking
    • Ventilation
    • Refrigeration
    • Wine Cellars
    • Kitchen Cleanup
    • Outdoor
    • Cookware
    • Cutlery
    • Accessories
    • 3-Year Signature Warranty
    • Brochures
    • Product Videos
    • FAQs
    • Specifications and Documentation
  • Where to Buy
  • Cooking School
  • The Viking Life
    • Food and Wine
    • Events and Travel
    • Our Favorites
    • Videos
  • About Viking
    • New at Viking
    • The Viking Story
    • The Viking Commitment
    • Careers
    • Other Viking Sites
  • Design Resources
    • Featured Designers
    • Designer Kitchen Gallery
    • Viking Kitchen Gallery
    • Planning and Design

Cheese Straws

by Karin Calloway

Cheese straws are about as Southern as it gets. These savory little crisp pickup nibbles are served at cocktail parties and most older Southern hostesses have a box of cheese straws on top of the fridge or in the freezer during the holidays.

  • 1 pound extra sharp cheddar cheese, grated and softened
  • 1/2 cup (1 stick) butter, softened
  • 1 1/2 cups all purpose flour
  • 1 teaspoon baking powder
  • 1/2 to 1 teaspoon cayenne pepper (Hubby likes 1 1/2 to 2 teaspoons!)
  • 1 teaspoon salt

Preheat oven to 325 degrees (or 300 degrees on convection bake). Place the cheese and butter in a food processor fitted with a steel blade. Pulse until combined. Add the remaining ingredients and pulse until the dough forms a paste. Place a portion of the dough in a cookie press fitted with a star tip and pipe onto a nonstick or parchment paper-lined baking sheet. Repeat with remaining dough.

Bake for 10-15 minutes (13 minutes was perfect for me on convection bake), until the cheese straws have almost stopped sizzling. Remove to a wire rack and cool completely. Store in an airtight container.

Makes about 4 dozen.

Print This Page
Cheese Straws

Related Recipe Categories
Appetizers

Karin Calloway is a freelance writer, corporate chef and cooking instructor who lives in Augusta, Georgia. More.

  • Food and Wine
    • Recipes
      • Appetizers
      • Beverages
      • Breads
      • Breakfast and Brunch
      • Desserts
      • Main Dishes
      • Sauces, Spreads, and Spices
      • Soups and Salads
      • Vegetables and Sides
    • Food and Wine Articles
    • Cookbooks
    • Thought Leaders
  • Events and Travel
  • Our Favorites
  • Videos
  • Products
    • Cooking
    • Ventilation
    • Refrigeration
    • Wine Cellars
    • Kitchen Cleanup
    • Outdoor
    • Cookware
    • Cutlery
    • Accessories
    • 3-Year Signature Warranty
    • Brochures
    • Product Videos
    • FAQs
    • Specifications and Documentation
  • Where to Buy
  • Cooking School
  • The Viking Life
    • Food and Wine
    • Events and Travel
    • Our Favorites
    • Videos
  • About Viking
    • New at Viking
    • The Viking Story
    • The Viking Commitment
    • Careers
    • Other Viking Sites
  • Design Resources
    • Featured Designers
    • Designer Kitchen Gallery
    • Viking Kitchen Gallery
    • Planning and Design
  • Utilities
    • View Cart
    • Request a Quote
    • My Account
    • My Viking Kitchen
    • Register Products
    • Customer Service
    • Email Updates
    • Shipping and Returns
    • Privacy Policy
    • Terms and Conditions
    • Purchase Agreement
    • Safety Recall Information
    • International
    • Site Map

© 2001-2013 Viking Range, LLC. All Rights Reserved.

  • Options
  • Installation Accessories
  • Accessories
  • Edit
  • Previous
  • Next
  • Save to My Quote