8 Places to Put the Microwave for a Better Kitchen Design By Yanic Simard, Houzz
The classic kitchen work triangle organizes foot traffic from the fridge to the sink to the stove, in an attempt to make cooking and preparing meals flow more smoothly. But what about the other major, although sometimes smaller, appliances that many of us use every day? Take the microwave, for example. You can place a microwave high, low, out of sight or within easy reach, and there are pros and cons for every choice. Here’s a look at those advantages and disadvantages, so you can figure out the kitchen configuration that’s right for you.
1. Below the counter. Don’t have much counter or upper cabinet space to spare? Consider replacing a lower drawer with a microwave cabinet. Pros: Leaves the counter clear and the sightline open, especially when paired with airy upper shelving. Cons: If the microwave is too low, moving dishes in and out of it can be a nuisance. Plus, if you have curious small children, this could be a dangerous option. Construction considerations: Removing a large drawer front can often leave a suitable space at virtually no cost. For the tidiest fit, choose a microwave-ready base cabinet during construction for typically the same cost as a standard drawer cabinet.
2. Integrated into cabinetry. A sleek custom option for those who love the look of beautifully featured appliances. Pro: The height can be customized for the best reachability. Con: If it’s placed too far from a counter, the danger arises of holding a hot plate and having nowhere to quickly set it. Construction considerations: It’s hard to retrofit unless a cabinet happens to exist at a good height and size, and you may need a customized cabinet for the perfect height (or to accept one of your cabinet supplier’s standard options). Also, a beautiful trim kit will look spectacular but cost extra.
3. In a spare cabinet. This option is such an easy DIY fix. I used it in my own kitchen to keep the appliance out of the way between occasional uses. Pro: Like an integrated style, this setup lets you put the microwave at a convenient height (or in an underused cabinet to save space), at little cost. Cons: Neat freaks will be annoyed when others leave the door open or leave crumbs in the crannies. Also, opening the cabinet door might be a bothersome extra step for those who use the microwave very frequently. Construction considerations: If a suitable cabinet exists, the only difficulty typically will be drilling a hole for the wiring to reach an existing plug, making this a relatively easy DIY project. If you plan for this during construction, a plug could be provided inside the cabinet to avoid visible cords. Check your microwave user guide to ensure that the open door will provide sufficient heat ventilation.
4. Angled corner cabinet. A convenient option for large kitchens where deep corners will otherwise go unused. Pros: Fills a corner and faces into the room for ease of use. Makes better use of a deep cabinet that might otherwise contain hard-to-reach items. Con: Some space will be unused behind the microwave and behind other appliances or drawers. Construction considerations: Typically a corner cabinet is planned during construction and not easily added after. If your cabinet system or company provides corner cabinet options, the cost shouldn’t be much different than that of a standard cabinet.
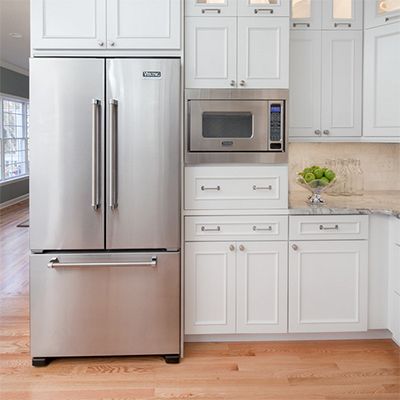
5. Over the range. Not always the most beautiful option, as opposed to a sleek hood fan, but effective for making the most of limited space. Pro: Microwave and hood-fan combos do double duty to save space in a compact kitchen. Cons: If the microwave is too high, reaching and seeing in will be difficult for many users. It also replaces a sculptural range hood for a somewhat less elegant look, and typically is not as effective at venting. Construction considerations: It’s best for the microwave and range finishes to match, so try to source the two components from the same manufacturer. After that, installation is pretty straightforward and usually takes a few hours, depending on how long it takes to remove an existing range, hood and microwave, and whether or not cutting needs to be done to counters and cabinetry to make the new units fit.

6. At a drinks station. A smart option for a butler’s pantry, basement bar station or other secondary food-prep space. Pros: Moving the microwave to a side station puts it near the coffee machine for quick breakfasts or snacks, and away from the primary chef in a busy household. Con: It’s not ideal to have the only microwave far from the fridge or main prep space if it’s used often for cooking. Construction considerations: The typical construction issues will apply depending on how the microwave is mounted. When the microwave is the only visible major appliance, consider featuring it as an accent instead of hiding it.
7. In an appliance garage. An excellent, trendy option for those who wish to hide multiple appliances between uses. Pro: Keeps small appliances hidden at counter height for ease of reach. Con: Uses extra space as opposed to simply keeping items on the counter. Construction considerations: A short stretch of counter can be turned into an appliance garage retroactively, although the very best option would be an extra-deep counter (30 inches rather than 24 inches) to leave usable space in front. If you’re adding a door after, use a contrasting finish (like metal) if you can’t match your existing paint, or the style will be off. Expect to pay $150 to a few hundred dollars for a standard model — during or after construction.
8. In the island. Keeps the microwave out of sight without completely covering it up, and makes strategic use of the island, which can often otherwise end up as odds-and-ends storage. Pros: Saves the main cabinets for storage. Also, you can position the microwave away from the main cooking area, so someone who isn’t doing the main cooking can use it without worrying about bumping into the one who is. Con: A low microwave will be harder to reach, especially if the counter has a deep lip. Construction considerations: If your island is being built out of lower cabinets, a microwave cabinet won’t cost much extra, but you will need electrical run to the island, making this tricky to add to an existing island. New This Week: 4 Subtle Design Ideas With Big Impact for Your Kitchen