Outdoor Kitchen Planning Guide
Anticipate your requirements for your outdoor kitchen to get the most flexibility during its use. With a complete Viking outdoor kitchen, you now have not only the most complete line of outdoor appliances, but also the cabinets that provide the same storage and organizational capabilities of an indoor kitchen. Now you can prepare your appetizers, drinks and food outside while remaining part of the group, rather than having to go inside.
When planning the outdoor kitchen layout, consider the flow of people during outdoor cooking and entertaining as well as the flow from inside and outside the house. Since the kitchen is made up of individual cabinets, they can be arranged in virtually any combination allowing for true customization.
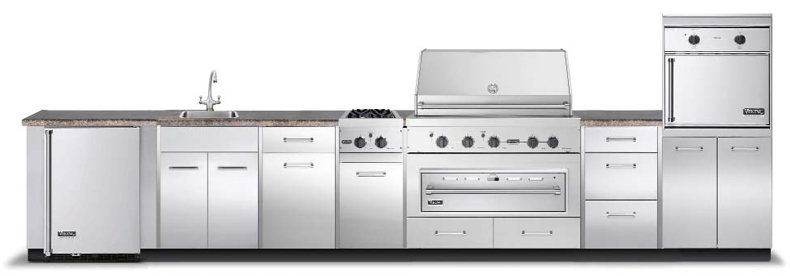
Viking Outdoor Cabinets have been designed to be easily installed by contractor or consumer. The cabinets are designed completely of stainless steel and provide a rich, contemporary look that complements Viking outdoor appliances. The cabinets are 341/2" high where the toe kick area is 41/2". Locally supplied countertops must be mounted on top. The leveling legs on each cabinet allow for adjustments on uneven surfaces. The leveling legs allow for a minimum adjustment of 341/4" and a maximum of 36". Typically, the first cabinet is placed at the highest point and the other cabinets are leveled from there. To gain the most flexibility from the kitchen design, separate all appliances by at least one base cabinet or with available 4"W. fillers (VFLR4). Remember to account for the 8" minimum the rotisserie motor requires for installation when placing cabinets next to a grill base. All cabinets are 30" deep.
The cabinets can be installed against a house, a masonry, a stucco half-wall or freestanding in an island configuration. A stainless side panel (VSP30) is available to finish ends where a wall doesn't exist. Each cabinet is leveled using the attached leveling legs and then together. Choose a countertop material of 11/4" (like granite, quartz, etc.) or more (other stone, tile, etc.). If the countertop is greater than 11/4" thick, you should use shims (not included) to install the appliance (grill, side burner, wok) flush to the countertop. After the countertop is installed the appliances are placed in them and the kitchen is complete.
 For more information and help planning your Outdoor Kitchen, download our Outdoor Stainless Steel Cabinetry Planning Guide or contact a dealer near you!